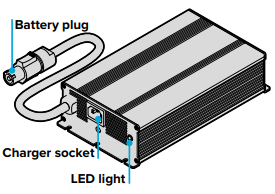
How do I charge my UBCO?
Being an electric bike, it might be helpful to know how to charge your bike right? Well this article covers all you need to know about how to charge your new UBCO bike.
How to charge the power supply:
- Turn off the 2X2 using the key fob.
- Plug the charger into the charge socket on the power supply and twist to lock.
- Plug the provided charger into any standard wall socket and switch on at the wall (where required).
- The LED indicator lights on the charger will signal:
RED – Solid: Charging as normal
RED – Flashing: No power supply connected
BLUE – Solid: Power supply voltage fault
BLUE – Flashing: Reverse polarity.
If a charge error occurs, disconnect the charger from the power supply and wall socket. Reconnect. If flashing persists, contact your UBCO dealer.
When charging:
- Keep away from any sparks or flames.
- Install a smoke alarm near your charging area.
- Do not charge if cables, charger, or power supply are damaged.
- Use charger in dry, indoor conditions only and with adequate ventilation.
When finished charging: replace the waterproof cap over the charging socket on the power supply. Depending on the remaining charge, the power supply can take up to 6 hours to fully charge.
Never store the power supply in an uncharged state. Doing so can void the warranty.

Checking Power Supply Charge
To check the capacity of your power supply, ensure it is plugged in to the 2X2 and press the key fob to turn the bike on. The charge meter on the left hand side of the LCD display will indicate the remaining charge.
Charge level is also available on the UBCO App. The yellow ‘Charge Required’ light at the top of the display will also illuminate when the remaining charge is low.
To operate properly, the plug and sockets need to stay clean and in good condition. If the power supply is removed, ensure that the battery plug is reinstalled correctly.